Hello Pierre-
Dan here.
First thing: Where do I send the R8 skin? Please send a complete address and a local contact phone number - I need that to book the collection; they even want a "county" even for countries that don't have counties, so if there is an equivalent please include it.
The R8 repairs are completed. Sorry it took so long. I started last Wednesday afternoon, finished Friday evening. Before I started, every time I looked over at it I thought what on Earth am I going to do with that?
Wednesday morning after turning the table around I looked it over. I made a little list.
1. Hole in wing
2. Wing tips
3. Tail tape & check nose
4. Sewing on trailing edges at corners
5. Spreader pocket area x2
6. Spar top area.
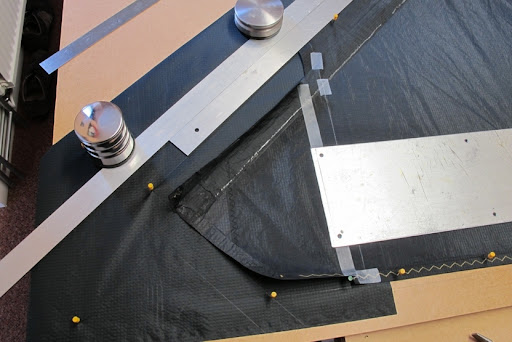
I started by marking the wings where the pockets were, since the sleeves would be covered over where they were frayed, covering where the pockets were.
I took off the pockets, planning to use them to copy them as exactly as possible, so the spreader would fit the same as before. The tiniest differences in or out, up or down, would mean that the spreader fit was lost.
The hole if the wing was well taped, so I didn't think it needed anything. (But I covered the tapes with ripstop anyway.)
The nose was repaired already with tough looking tape. There was only a small hole in the tail tape. As it happened, I ended up making a new thick tape.
The trailing edge stitching, step 4, no longer mattered because after removing the thread from the wing leading edge sleeves and opening them up, I found too much deterioration to simply patch. I had no choice but to open the sleeves as far as possible, tack the outer wings down and replace the tips entirely. It didn't go to plan; it's not possible to get wings flat on the table if the sleeves are left partly sewn, which I had to do. I could only tack down the outer wings beyond the spreader pocket area.
After the tips, I found several breaks in the trailing edge sewing, so I removed the two rows of straight stitching. The areas of broken multi-stitch zig-zag (yellow) were cut off already.
I made some patches for the tapes at the top ends (nose ends) of the wing leading edge spars, and patched the areas where the new spreader pockets would be.
The wing tips have double dacron tapes, inside and out. Not heat sealed, so watch for fraying, and trim whenever necessary. Melting with a gas lighter is tricky.
I haven't had black Bainbridge for a year; I was out of black Paratex, so I had to use some black Ikarex, the stuff Flexifoils are made of. It's the most expensive fabric I've ever had, but it's too stretchy for whole deltas. It is very durable.
It took longer to take everything apart than to re-make it all. The new spreader pockets look pretty good - the spreader should fit pretty closely to what it was before.
Because the wings wouldn't lie flat I had to use the cut off tips to locate the wing tip point, the defining point. Fabric was missing in places, so it was a guess - it could only be measured if the wings would lie flat, so I couldn't measure them. Worst case scenario: you might need to trim the wing spars a little.
When you get it back, I also recommend that the new dacron wing tip tapes (black stunt kite dacron) be covered with a layer of the tape you used on the hole in the wing, or something equivalent.
All the best,
-Dan
ps: included some photos
--
Dan & Bev Leigh
54 Osborne Road, Pontypool, Gwent NP4 6LX
UK
landline: 0044/0 1495 750875
e-mail: danleigh@deltas.freeserve.co.uk
Voici quelques photos :


Je suis bluffé par un tel suivi et un tel professionnalisme, Dan est un artisan amoureux du travail bien fait, certes ses créations sont un peu plus chères que les CV industriels fabriqués en Chine....


